
How many Action Points does each Operator get in STAR WARS Zero Company combat?
Three AP per Operator per turn. Move, shoot, ability, utility, and Overwatch all spend that same three.

Searching star wars zero company combat? STAR WARS Zero Company fights are isometric turn-based tactics from Bit Reactor, published by Electronic Arts. Your four Operators act first, then the enemy. Each Operator gets 3 Action Points per turn; Advantage is a shared pool (cap 10) that does not cost AP. Cover, flanking, High Ground, destructible cover, and Overwatch decide hit chance. Verified August 28, 2026. Steam.
This STAR WARS Zero Company combat page is the turn-budget reference — not a class tier list. Pair it with weapons for AP-per-shot and the den for the Medbay that cleans up a bad fight.
| Fact | Detail |
|---|---|
| Focus keyword | star wars zero company combat |
| Turn order | Player squad first, then enemies |
| Action Points | 3 AP per Operator per turn |
| Fast / slow | Typical weapon Fast = 1 AP · Slow = 2 AP |
| Advantage | Shared pool, cap 10, no AP cost |
| Cover | Partial and Full — lower incoming hit chance |
| Flank / High Ground | Raise your hit chance; High Ground can ignore same-level cover |
| Destructible cover | Some cover breaks — Repeater is the public opener |
| Overwatch | Cone; remaining AP = shots vs enemies that enter or act |
| Squad | Up to 4 Operators per mission |
| Mode | Single-player only |
| Platform | Steam · Epic · PS5 · Xbox Series X|S |
| Related | Weapons · The Den · Beginner |
| Verified | August 28, 2026 |

STAR WARS Zero Company combat is not “move then shoot.” Every Operator starts the turn with 3 AP. Move, attack, ability, utility (medkits, grenades), and Overwatch all draw from that same three. The HUD shows the cost when you highlight an action — Fast weapon actions are typically 1 AP, Slow actions 2 AP.
| Spend | Typical cost | When it is worth it |
|---|---|---|
| First move of the turn | 1 AP, longer distance | Close into Partial/Full Cover or a flank tile |
| Second / third move | 1 AP, shorter distance | Only if the first move left you orange / exposed |
| Pistol shot | 1 AP each | Delete low-HP droids; stack status mods |
| Rifle first shot | 1 AP | Decent damage without emptying the turn |
| Rifle follow-up | 2 AP | Only if the first shot still leaves a legal Slow |
| Longarm shot | 2 AP | Targets nobody else can reach |
| Repeater burst | All remaining AP | Break destructible cover or dump into a bunker |
| Overwatch | All remaining AP | Last action — leftover AP become reaction shots |
Movement looks simple and hides a trap. The first movement of a turn covers more ground than the second or third. Community captures use Hawks as an example (about 9 m first move, then about 5 m later moves of the same turn — unverified exact meters). Passives and equipped abilities can change the gap, but the rule of thumb holds: do the long reposition first, then shoot, then take a short hop — not the other way around.
Hawks’ confirmed unique talent is Fearless Leader (aura while standing). Some community videos also show a Pico-5 Advantage spend that gifts an ally +1 AP — treat Pico-5 as unverified until you see it on Hawks’ kit, and do not confuse it with Fearless Leader. If Pico-5 exists in your build, the gift is useless on an Operator who already has 3 AP, and it does not add an extra Overwatch shot because Overwatch spends AP at activation.
Once the 3 AP are gone, the only confirmed way to keep acting is Advantage. That is the next section.
Matched by build plan, shared topics, and guide progression — not random related links.

Advantage is a STAR WARS Zero Company combat resource the whole squad earns together and spends individually. Cap is 10. It does not cost AP, so it is how you fire a special after an Operator has already dumped their three points.
| Rule | What to do |
|---|---|
| Shared, not personal | Any Operator can spend what the squad banked |
| Cap 10 | Overflow is wasted — spend before you sit at 10 |
| Earned in combat | Hits and combat actions bank Advantage — exact per-hit amounts vary; confirm on HUD |
| Scout tools | Scout kits are built to generate Advantage for the shared pool |
| No AP cost | Spend after the 3 AP turn is empty, or to unlock a special mid-turn |
| Plan at turn start | Count current Advantage vs the next special you actually need |
Public specials that eat Advantage include Soldier Rocket Strike, Sharpshooter Precision Shot, Heavy Bulwark-style control, and Scout Ambush. Community videos also mention Hawks Pico-5 (+1 AP gift) — unverified vs the confirmed Fearless Leader talent. Exact costs stay client-side — highlight the ability and read the Advantage number before you commit. Sitting at 10 while a Soldier ultimate is ready is the classic leak.
A Scout mark/radius plus a grenade that tags several bodies can fill the pool on turn one. That is the intended burst, not a glitch. The risk is spending the whole 10 on the first pack and walking into the named commander with an empty meter.
Advantage wins turns. Cover decides whether you get to take the next one.
Official STAR WARS Zero Company combat copy puts Cover → Flanking → High Ground → Line of Sight in that order. Cover is Partial or Full. Both lower incoming hit chance. Flanking from the side or rear strips a lot of that safety. Line of sight still has to exist — a Full Cover crate you cannot see around is not a firing lane.
| Tell | Meaning | Action |
|---|---|---|
| Blue silhouette | Using nearby cover | End the move here |
| Orange silhouette | Exposed — even B1s will connect | Spend another AP or accept the hit |
| Partial Cover | Lowers incoming hit chance | Fine for a mid-range Rifle; still flank if the % is ugly |
| Full Cover | Stronger incoming cut | Do not peek the same tile the enemy is aiming |
| Flank tile | Removes much of the cover bonus | Walk it before you dump a Longarm Slow shot |
The interface will happily let you stop one pixel short. At the far edge of a move range the path can nudge and dump you orange in the open. When a reposition is pivotal, confirm the silhouette before you release.
If a target is bunkered, walking the flank often beats stacking another Slow shot into Partial Cover. Backup (next but one) can force a hit through bad %, but it still wants line of sight — it is not a substitute for a legal flank tile.
Cover you can break is a different tool. High Ground is the other.
High Ground raises your hit chance and can shoot over same-level cover that would otherwise eat the shot. It also pulls you out of many melee ranges. Put a Sharpshooter or Scout up there; do not park a pistol Gunslinger on a perch they cannot climb down from in one Fast move.
Some pieces are destructible. A Repeater burst is the public opener against a bunkered target: it has no fixed AP cost, it spends remaining AP, and where cover can break it usually does. That leaves an open target for the rest of the squad. Confirm the piece actually chips before you commit a whole turn to it.
Force Push / Pull (Jedi Padawan) and knockback grenades can throw an enemy off a ledge for an instant kill, or into an Overwatch cone. High Ground plus a knockback is a turn you spend on positioning, not on a Slow Longarm into Full Cover.
Once you can read tiles, leftover AP belong in a cone. That is Overwatch.
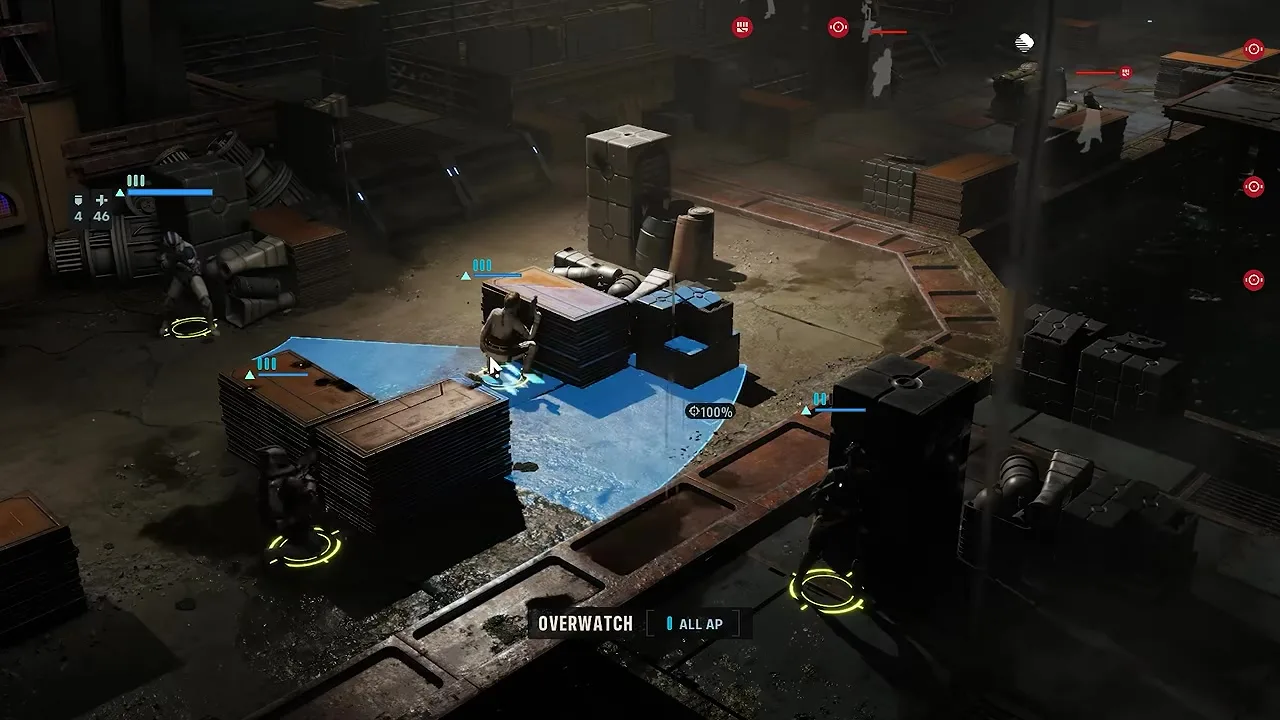
Overwatch is the last action on a STAR WARS Zero Company combat turn for a reason. It spends all remaining AP, locks the Operator in place, and fires a cone — not a 360° circle — when enemies enter or act inside it. Remaining AP equal the number of different enemies you can shoot. Two leftover AP means two enemies, not two shots on the same body.
| Rule | Detail |
|---|---|
| Cost | All remaining AP — even 1 AP still places a cone |
| Shots | Leftover AP become reaction shots (community: often one per AP vs different targets — confirm in client) |
| Shape | Adjustable cone, not omnidirectional |
| Accuracy | Read the % on the cone before you lock |
| Force movement | Push, pull, and knockback can trigger Overwatch |
| Backup | Community captures say Backup does not stack cleanly with Overwatch — verify |
| AP gifts | Unverified Pico-5-style +1 AP after Overwatch is placed usually does nothing |
The accuracy number does not improve as the enemy walks closer. If the cone reads 75%, it is 75% everywhere inside. Nudge placement for an extra 5–10% before you lock. A missed Overwatch shot is a wasted leftover AP.
When several cones overlap, resolution order can waste shots. Offset fields on a chokepoint instead of cloning the same arc four times (exact 50/50 spacing is community advice, not a hard rule).
Overwatch wins enemy turns. Call for Backup wins yours for free.
Call for Backup is the assist the official kit actually explains poorly. Each round a random ally gets the Backup command. It costs no AP and no Advantage. The user links to a partner; on the user’s next basic weapon attack, that partner fires an assisted shot. Jedi Padawan can substitute a Force interaction (Push) instead of a blaster assist.
Each Backup use feeds the pair’s Bond (community reports cite about +10 per use with a per-mission cap — unverified exact numbers). Max Bond passives are the long-run reason to click it even on a turn with no shot. Full Bond and Cross Training live on bonds.
If a status mod rides the Backup shooter, community captures say it can still apply on the assist — confirm on the tooltip. That is how you tag a marching B2 you could not legally reach with a 1 AP pistol walk.
Lock the habits, then stop improvising the same three mistakes.
A legal four-Operator deploy still loses if the turn order is sloppy. Work this list on the next tactical mission before you theorycraft Focus trees.
| Situation | Do this |
|---|---|
| Opening pack of B1s | Pistol Operator clears soft bodies; bank Advantage from hits |
| Enemy in Full Cover | Flank, High Ground, or Repeater the piece — do not Slow-shot the crate |
| Named commander about to act | Focus fire before they take a turn; Advantage specials are legal here |
| 1 AP left, bad hit % | Overwatch the cone they must enter, or Backup an assist |
| Fight over, Advantage left | Spend on a named special or bank for the next pack — do not gift into a full 3 AP Operator |
| Someone dropped to 0 HP | Rally if you can; then Medbay in The Den before the next Cycle |
Separatist droids take Ion-oriented kit. Infinite Coil shock troops do not — they are the Force-empowered problem on enemies. Swapping a pistol mod in the Armory between those mission types is faster than rewriting a class.
If Injuries stacked, stop deploying and open The Den. The next page is the base loop that decides whether this STAR WARS Zero Company combat page still has a squad to command.
Three AP per Operator per turn. Move, shoot, ability, utility, and Overwatch all spend that same three.
No. Advantage is a shared pool capped at 10. The squad earns it together (usually per hit) and any Operator can spend it. It does not cost AP.
Partial and Full Cover lower incoming hit chance. Flanks and High Ground raise yours. Some cover is destructible. An orange silhouette means you are not in cover at all.
As many as the AP you had left when you placed the cone. Community captures say each shot targets a different enemy in the cone — confirm in client.
No. It costs neither AP nor Advantage. Use it every round. Community captures claim the assist cannot miss with LOS — treat that as unverified and still prefer high-% peeks.
A community-captured Hawks Advantage spend that may gift +1 AP. Confirmed Hawks talent is Fearless Leader. Do not treat Pico-5 as official until you see it on your kit.
Match weapon AP on weapons, then treat injuries in The Den. First-loop habits: beginner guide.
Matched by build plan, shared topics, and guide progression — not random related links.